Storytime

Ever since I was a little girl, I remember a greenhouse in our garden. It was a DIY greenhouse made from a wooden frame and covered with a plastic film, and the size was about 2x3m. I remember running there and picking up sun-warmed tomatoes and cucumbers.

Although I don’t have many memories of it, it was a part of my childhood until time took over. Everything started with a cat’s scratch on the plastic cover, which made a big hole on the side, until the winter that came with a lot of snow, and by cleaning that off, stretched the material and cut the part of the roof open from snow shovel. It was the end of the greenhouse era in my home garden, and the best option was to remove it completely due to the broken cover and decaying wooden frame.
For a long time, we grew warm-loving plants outside, and it was okay if summer stretched just enough to ripen fruits. I do remember that we made a jam from green, unripened tomatoes, which tasted quite interesting, but not in a bad way.
After I graduated from college and moved back to my family house, I began to feel nostalgic, and also my huge interest in gardening took over, and I decided to buy a greenhouse.
Aspects of the new greenhouse

Since most of the gardens had polycarbonate tunnel greenhouses, I went for it as well. I really didn’t want another plastic film and DIY greenhouse again, I wanted a greenhouse that lasts long, is durable, looks great, and is easy to maintain, so a polycarbonate tunnel greenhouse seemed a good option, also from a price standpoint.
After choosing the greenhouse, I saved money that winter and waited until spring to actually order it. And so by March 2020, we drow to our currier with a tractor due to bad spring roads to get our new greenhouse. Everything went smoothly, and even though it was raining and super cold, the greenhouse arrived at our home safely.
Of course, I did go big on size and picked a 3x6m greenhouse with an aluminum frame and 6mm thick twin-wall polycarbonate sheeting for durability, and I’m glad I did not go for a thinner one. With doors/windows on one side and just a window on another. The greenhouse was made by a Lithuanian company, “BALTIC LT” and it cost around 500 euros (around $550), including delivery.
It took some time and effort to build it, sometimes even giving me headaches by figuring out some details that weren’t described specifically in the instructions. With the end peaces facing the wrong direction, we finally finished our new greenhouse at the beginning of April. It was strongly attached to the ground with metal pipes and was ready to start the season!
So, in summary:
- Size 3x6m
- 6mm clear twin-wall polycarbonate
- The aluminum omega profile frame
Interior of the greenhouse

Since it was already April, we did not have enough time to think or do about the interior, so we used materials that were already in our household – old boards. Inside was deviated using wooden boards into two sections – both sides with window end creating “U” and one central bed in the middle. The sides of the boards were pinned down with sticks creating ‘’raised beds’’ approximately 20 cm off the ground level.
Technically I wouldn’t call them raised beds due to the lack of richness in the soil, what a ‘’sandwich’’ technique does. The existing soil was really basic and sandy and, in hot temperatures, even dusty.
Plants and harvests through the years
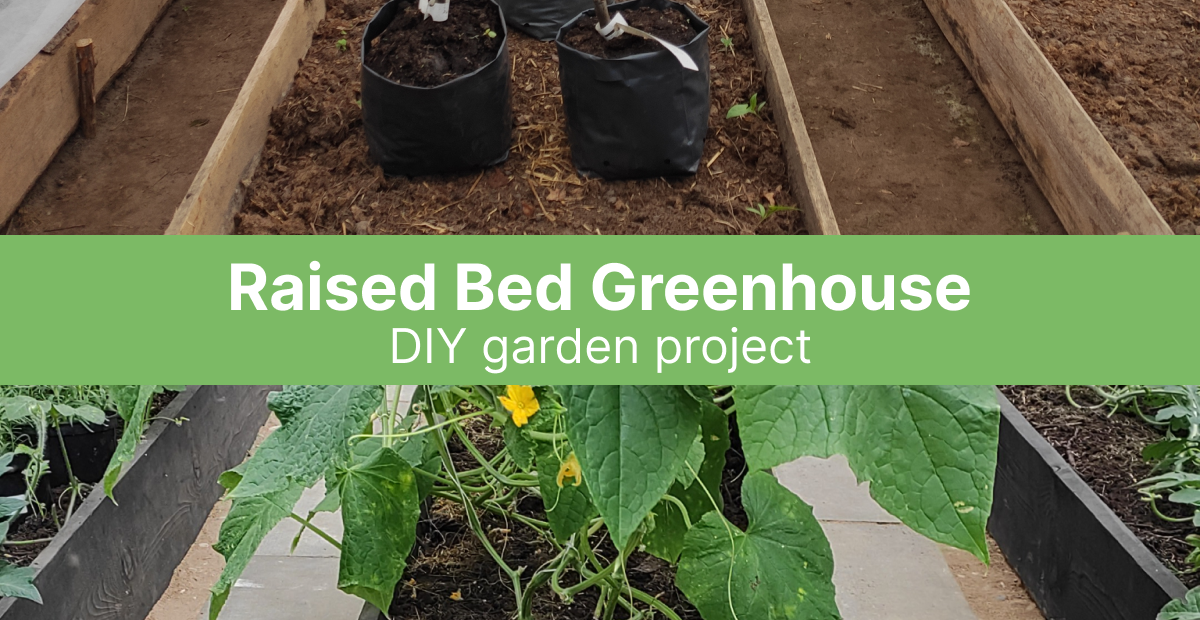
In that year’s 2020 spring, I added store-bought peat moss and black soil bags to the top soil layer to add some nutrients. We planted tomatoes, cucumbers, and bell peppers, and the harvest was okay for our family that year. Also, it was a great test time for the greenhouse and noticing what needs to be improved in the future.

The next year’s growing season of 2021, I tried to use the greenhouse to its potential, not only growing basic vegetables but also trying some more exotic plants, for example, melons, peanuts, and sweet potatoes. It was also used as plant storage in early spring for my new fruit orchard. Also, I tried winter sowing for the first time, which turned out successful.
For the growing season of 2022, I wanted to make significant changes not only in improving soil but also in changing the interior design of the greenhouse. After we improved soil quality, the harvest was significantly bigger, not only in amount but in size as well. Now, how we achieved modern looking, better functioning Raised Bed Greenhouse.
What is a raised bed greenhouse?
Before we dive into the process of creating changes in the greenhouse, let’s do the theory first.
A raised bed greenhouse is a type of greenhouse that is built above ground level, typically using raised beds or containers to grow plants.
Benefits of raised bed greenhouse:
- improved drainage and aeration for plants
- better control over soil quality and temperature
- the ability to easily move or rearrange the beds as needed.
Choosing materials to create raised bed in the greenhouse
In addition, a raised bed can be constructed using various materials, including wood, metal, or plastic, but since it will be inside the greenhouse and is a place to start the growing season early and end it late, the best materials would be the ones that don’t absorb heat or cold well – wood and plastic.
Raised beds give a place structure and tidiness. In fact that beds are above ground level, which helps with back pain while weeding, and it’s easier to harvest vegetables.
What should I put in my raised bed?
Raised bed concept is to fill it sandwich-style with organic materials, like branches and trunks at the bottom, leaves, grass clippings, straws in the middle, compost, and organic soil at the top. Like with compost, adding cardboard, cotton, and some food scraps that aren’t affected by mold is also possible.
The process of raised bed greenhouse makeover
When the weather in the spring was good enough to start working outside, we started by cleaning everything out of the greenhouse – removing existing raised beds, as well as digging out the old soil until it reached the old pathway level.
We decided to keep the structure of the interior the same, only switching to long-lasting materials.
Building raised beds

The next step was finding wood boards that were long enough to reach the old parameters of raised beds. After that, it was time to cut boards in even thickness and sand them. When that was done, we painted them with two coats of wood oil for growing boxes in carbon black color from “Tikkurila.”
To connect wooden pieces, we used “L” shaped angles and screws. When it was done, and everything moved into the right place, it was time to fill the beds.
Raised bed filling in the greenhouse
Before adding any organic layers to the greenhouse beds, we dug a trench in the middle of them. The first layer was small branches, which are good for drainage. The next layer was with old leaves and grass clippings – the perfect layer of air and long-term fertilizer when breaking down. The last layer was finished with homemade compost with a sprinkle of store-bought soil. And the beds were ready for the season.


Creating pathways in the greenhouse

The existing pathway, which was just sand, was an issue in any aspect. It was dusty in hot weather, making muddy feet when watering plants, and needed to be weeded from time to time. Thinking of materials, I really wanted to avoid any plastics, geotextiles, etc. After viewing different ideas on Pinterest, I decided to go with concrete blocks. They were available in the nearest construction store at a reasonable price and also would give a modern look inside.
Fun fact: I did buy them little by little and brought them in my car every time I visited the city.
When the necessary amount was gathered, it was time to level up the pathway. The concrete block size was 25x50cm, and it did not cover the whole area from one bed to another, so I filled those empty spaces with gravel. I was really happy about the end result.
Summary
It’s really important to choose the right size and material greenhouse for your family’s needs at the beginning. Even choosing a bigger size will benefit you because there are plenty of other plants to grow in the greenhouse, for example, warmer climate grapes and figs, that don’t tolerate cold winters.
Raised beds in the greenhouse will give you structure and control and ease of weeding and harvesting.
If you have any questions, ideas, or comments, feel free to leave your thoughts below!
 tomato plants")


Leave a Reply